Logging in AWS with .NET & Terraform
In this article we will cover how you can setup logging using .NET, Terraform for your applications in AWS.
The goal of this article is to make sure you have the necessary knowledge to enable logging in a .NET application in AWS, using Terraform to manage the infrastructure.
We will take small steps towards the end goals, and I suggest you follow these instead of copy pasting the final solution. This approach should help improve your understanding and troubleshooting abilities.
For now, we will not dig deeper into differences in frameworks, configuration or log levels. If these topics are of interest, I can suggest the links below
→ How To Start Logging With .NET | Better Stack Community
→ Log Levels Explained and How to Use Them | Better Stack Community
Setting up your application
In this example I will be using Serilog as my framework of choice, and to get started you need to install the nuget packages below. Other frameworks have similar approaches, but terminology can differ.
dotnet add package Serilog
dotnet add package Serilog.Sinks.Console
dotnet add package Serilog.Sinks.AwsCloudWatch
Serilog gives you access to the logging framework, where “Sinks” gives you the interfaces needed to push logs to different destinations, in this case AWS and your console.
If you are using another cloud provider, it’s likely that Serilog has a Sink available for that provider.
Logging to console
Using a simple console application, insert the code below and run the application.
using Serilog;

var log = new LoggerConfiguration()
    .MinimumLevel.Verbose()
    .WriteTo.Console()
    .CreateLogger();

log.Verbose("This is verbose logging");
log.Error("This a higher high level - ERROR");

Console.ReadLine();
You should be seeing the two different log entries in the console!
Accessing AWS from your application
Great job, you managed to get log entries to your console. Now it’s time to start pushing towards AWS.
Before doing so, we must consider how to handle the connection between our application and AWS. This requires an IAM user with sufficient permissions, you can find a guide from AWS here.
Once you have created your IAM user, we need to pass the access key and secret to the application. Avoid hard coding these values in the application as code is usually pushed to repositories, sometimes public, where unwanted actors could gain access to your account.
AWS Parameter Store
We can use parameters to manage configuration and secrets in AWS, that later can be passed to our application.
Below we have defined two separate parameters, representing the IAM users access key and secret.
Note that you will need to go into the AWS Console and manually fill out the value of each parameter, as we do not want to keep sensitive data in our code.
resource "aws_ssm_parameter" "aws_application_access_key_param" {
  name        = "/production/iam/applications/accesskey"
  description = "The access key used for applications connecting to AWS"
  type        = "SecureString"
  value       = "please fill this in console"

}

resource "aws_ssm_parameter" "aws_application_secret_param" {
  name        = "/production/iam/applications/secret"
  description = "The secret used for applications connecting to AWS"
  type        = "SecureString"
  value       = "please fill this in console"

}
To be able to access the value of the parameter we also need to define data objects in Terraform.
data "aws_ssm_parameter" "aws_application_access_key" {
  name = "/production/iam/applications/accesskey"
}

data "aws_ssm_parameter" "aws_application_secret" {
  name = "/production/iam/applications/secret"
}
Depending on what service you are using to run you application, the below snippet can be different. If you are using Elastic Beanstalk, we can add these parameters as environment variables.
resource "aws_elastic_beanstalk_environment" "tf-test-env" {
  name                = "test-env"
  application = aws_elastic_beanstalk_application.tf-test.name
  solution_stack_name = "64bit Amazon Linux 2023 v3.1.5 running ${var.language}"
  tier = "WebServer"

  ...
  ### Other settings..
  ...


  # Environment variables to pass from Parameter Store
  setting {
    namespace = "aws:elasticbeanstalk:application:environment"
    name      = "APPLICATION_ACCESS_KEY"
    value     = data.aws_ssm_parameter.aws_application_access_key.value
  }

  setting {
    namespace = "aws:elasticbeanstalk:application:environment"
    name      = "APPLICATION_SECRET"
    value     = data.aws_ssm_parameter.aws_application_secret.value
  }
Run terraform plan and terraform apply to push your changes to AWS.
Adding the logger
First, we need to fetch the IAM access key and secret that were populated as environment variables in Elastic Beanstalk.
var accessKey = Environment.GetEnvironmentVariable("APPLICATION_ACCESS_KEY");
var secret = Environment.GetEnvironmentVariable("APPLICATION_SECRET");
Then we need to define a naming convention for our log streams. This is done by implementing the ILogStreamNameProvider and defining a format for your log stream
class LogStreamNameProvider : ILogStreamNameProvider
{
    private readonly string DATETIME_FORMAT = "yyyy-MM-dd-hh-mm-ss";

    public string GetLogStreamName()
    {
        return $"MyCoolApp_{Guid.NewGuid()}";
    }
}
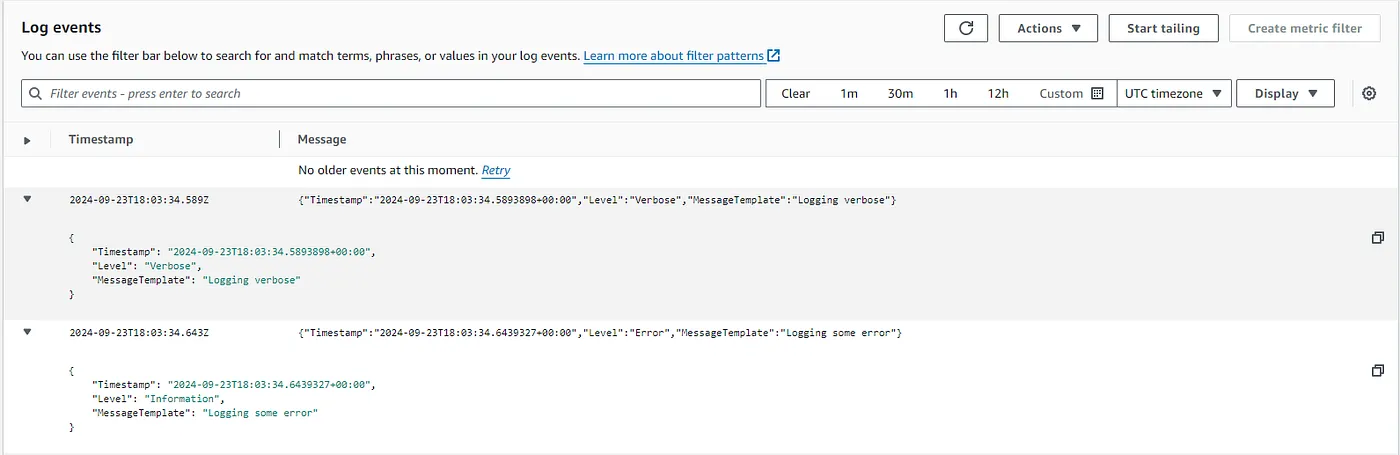
Result in CloudWatch
Once done, we need to create a client and provide options that defines where our logs should end up, what they should look like and how we want to carry out the logging.
// create the client that connects to AWS
var awslogger = new AmazonCloudWatchLogsClient(accessKey, secret);

// configure how and where we would like the logs to end up in CloudWatch
var options = new CloudWatchSinkOptions
{
    // the name of the CloudWatch Log group for logging
    LogGroupName = "/aws/dotnet-app/logs",

    TextFormatter = new JsonFormatter(Environment.NewLine),

    // other defaults defaults
    MinimumLogEventLevel = LogEventLevel.Verbose,
    BatchSizeLimit = 100,
    QueueSizeLimit = 10000,
    Period = TimeSpan.FromSeconds(10),
    CreateLogGroup = true,
    // pass our newly created LogStreamNameProvider
    LogStreamNameProvider = new LogStreamNameProvider(),
    RetryAttempts = 5
};
Last, but not least, we need to create our logger and add a destination for Cloudwatch.
var log = new LoggerConfiguration()
    .MinimumLevel.Verbose()
    .WriteTo.Console()
    .WriteTo.AmazonCloudWatch(options, awslogger)
    .CreateLogger();

log.Verbose("Logging verbose");
log.Error("Logging some error");
Deploy you application and you should see something like this in CloudWatch
Closing remarks
Logging is a wide topic and there are many considerations to be, but a few questions worth considering:
- Consider structured logging
- What do we need to log? (probably not everything)
- What log levels do we need?
- How do we respond to, and monitor different log levels?
- What log level should be applied for environment x? (probably do not want debug traces in production)
Preview image..